Monday, August 19, 2013

Minecraft 'cake block' birthday cake

One of my favourite cakes we have made is a Minecraft cake we made for our son's 10th birthday. This cake was quite easy. 


At first we didn't know what kind of Minecraft cake to make, as there were many types online, we considered trying to make a Creeper (a green zombie guy), but then I noticed some doing a "cake" block. Minecraft is made of blocks, kind of like Lego, and the blocks can be made of different things, like dirt, water, lava, etc. There is a special block in the game that is a "cake" block. Perfect.


After reading the Minecraft Wiki, we found out it is "made" with sponge, white icing and strawberries or red frosting. We decided sponge would be too soft and went for a vanilla cake. Two were baked in a large square pan and then butted together with icing. We made the fondant for the first time and it was as nerve wracking as I'd imagined. I really wanted the sides to have fondant as well, but we ran out of time again, grrr, I smell a theme here. 

We decided we would place the "cherries" exactly as they were on the block in the game, to be authentic...

We could have stopped there, it looked great already, but it was our boy's first double digit birthday and we wanted to celebrate that. Sneaky had received a letter and number set of cake pans and was itching to use them. So we did the 10 in chocolate cake, and made some extra bar cakes up with the same tins. These were then covered all around the sides in chocolate buttercream icing then rolled in crushed chocolate biscuit crumbs. The tops were iced with green buttercream icing and dipped in green coloured coconut. The cake board was covered in chocolate buttercream icing and crushed chocolate biscuit crumbs.


I was upset about the sides and thought it looked messy, as you can see I've tried to cover it with the dirt blocks around the sides. But we got the overall effect, we know that by our son's reaction. He absolutely loved it. After checking it out for over 5 minutes he ran over to the computer and pulled the game up, got a cake block on screen and started going back and forth checking the placement of the "cherries". Then he congratulated us on getting it right hahahaha.


This was a huge hit and I would recommend a neater version for any Minecraft lover.

Sidenote- Those candles are "magical relighting candles" that I got at the supermarket for a couple of bucks, they nearly stole the limelight and made for a hilarious birthday video.

Friday, August 16, 2013

Playboy Cake, white chocolate ganache coloured pink - it can be done, and easily too!

After reading through my first post (many times, ugh), I realised it didn't have any dollar saving tips or any real issues..that were solved. So today I want to talk about our latest cake, which gave us plenty of challenges.
We made this cake for a friends daughter, Nikki. She wanted a pink and black Playboy caramel mud cake. We were stressed because it was the first cake we would make that wasn't for family or children, and it would be presented to her in a pub full of people we didn't know, ack major fear. 

The sweetness of caramel mud cake had us worried. We are not proficient at making fondant and hate the sickly sweet taste, so we opted for a white chocolate ganache. White chocolate so we could colour it, or that's what we hoped. After many hours of research I realised it wasn't as easy as banging some colour into the melted chocolate. I read many articles about using gel colours, Candy Melts and oil based powder dyes specifically made for chocolate. I live in a small country town, with only limited supplies nearby, I was beginning to think I would have to try something else until I finally found this forum cake-decorating.livejournal with confirmation that liquid dye had been used successfully. I decided to go for it (I didn't have many other options). 

Next was getting the perfect texture for the ganache, we wanted a thick smooth covering, while hunting I found vanilla sugar blog  which is amazing and this recipe was perfect for what we wanted. I decided we would just bang liquid red dye in the cream, get it as red as possible, then mix in the chocolate, believing the chocolate would dilute the colour once added. 

We tested with small batches. We also made some test cupcakes using caramel mud cake mix and caramel cake mix, we tried one of each and one mixed, trying to dilute some of the sweetness. The caramel mud cake was the sweetest, a very artificial taste, the caramel cake was a more authentic caramel flavour but not as strong, so we decided to go with the mixed version. We used the cupcakes to test the pouring ability of the chocolate. 

The first test came out great, I heated the cream to near boiling point, then added the colour, heaps of red, then poured this over the chocolate which I had ready over simmering water., the chocolate melted beautifully and was a rich red colour, we let it cool and thicken slightly. Then poured slowly over a cupcake with a spoon, you do have a little time to spread it with the back of a spoon without leaving marks. The white in the chocolate didn't dilute the colour much, so we decided we would add pink for the next batch.


so shiny once dry
We were happy after the test and concentrated on getting the flavours of the cake right, Once the mixed mud and caramel cake was cooked, Sneaky decided he wanted it to be higher, so decided to cook another cake and layer it. I was still concerned about the sweetness, especially mixed with the white chocolate. so we opted for a butter cake for the bottom layer. Once that was cooked, we tried it together with some of the left over red chocolate, Sneaky thought the caramel flavour wasn't strong enough, so he made up the 2 icing mixes that came with the cake mixes. We then tried each of these with the cake and chocolate, it was good and caramely, but Sneaky thought it needed one more hit and added Nestle Top'n'Fill Caramel to the icing, this went between the two slabs of cake.


Now the cake was ready to be cut out. 


I found the template at CakeCentral for the Playboy bunny, enlarged it in Word. This involved measuring the baking tin, then keeping the measurements of my document in word within those measurements. I then had it printed out at the local printer (lucky to have one here) on A3 paper, which cost me nada, YAY. We then cut it out and placed it on the cake...


Aaaah poop, it was just that tiny bit over at the bow and the edges of the ears, after all my measuring. I'd like to blame Sneaky here as I believe he jammed the tops of the cakes together when I think he should have jammed the bottoms together. The tin he baked them in flared out just a dash from the bottom up. Anyway Sneaky solved the problem by cutting along the neckline, removing the whole bow section, then he cut the bow part from another part of the cake, I did not witness this first hand as this is when I had to leave the room and find a beverage, way too nerve wracking for me.


Once this was done we prepared to apply the ganache. Now of course the ganache did not pour over the bunny shape as easily as the cupcake, didn't seem to pour at all, this is when I started to panic and left the room again. Sneaky was confident he could get it smooth with the knife, he smoothed by dipping the knife in hot water first. He did a fantastic job and all that was left now was the fun stuff. 

Our cake board was a new floor tile with black contact paper over, we cut a template of the cake shape in grease proof paper and placed under the cake on the board to keep the cake from touching the contact as we were unsure of the safety of food on contact. I did research it and the opinions were conflicting so I thought it best to play it safe.

We already knew we wanted black and silver for the details, so it was just a matter of placing them...yeah right. Those little silver balls are a pain to place on smooth icing. I had wanted to cover the whole bow and collar with balls but we were running out of time, so just went with the one row. The chain in the eye was my idea, I had initially thought a ring would go well there, but couldn't find one. 


Now you may just see this cake online with the name spelt "Nikki" instead of "Nikky" as pictured here. That's because on the way to the venue I had a panic attack and guessed we might have spelt her name wrong, so I checked through my messages from her Mum, and there it was Nikki with an "I". Aaaaaargh, so I had to remodel the "Y" on the way. 


It's also pretty obvious we ran out of time, our cake board is really bare and the "Happy Birthday" was a last minute addition.
All up we were pretty happy with this cake, actually very happy.
We learnt a lot, and realised we have to give ourselves much more time.


Minecraft cake coming soon.

Sunday, August 4, 2013

Giant crochet granny square

I finally learned to crochet, I had been trying for a couple of weeks using books and Google. I couldn't grasp it, I thought. But I realise now, I was mostly following the instructions properly, I just didn't think I was, I kept doubting it, saying to myself "You couldn't really put the hook in there, could you?" or "That doesn't look right" 

Anyway, I got my Mum over a couple of days ago to set me straight. So nice to have someone explain it properly, thank you Mum X. I can now look at crochet and see what a treble is, what a double is, before I had no idea, it just looked like bumpy stuff. Well now that I get it, I love it. I have been experimenting with hook sizes and yarns since. I really wanted to learn the granny square, which I have YAY!

My first attempt.


something doesn't look right.

Next I tried changing colours, my way :)

grrr I spy a dog hair.
And the regular way.


These were all made on an 8mm hook.
I was so happy with this, I wanted to get funky now, so I busted out the 15mm hook and started going through my yarn.
This mess was a multi strand knitting test.


So I decided I MUST have some of this yarn to crochet with..arrrgh...I love knitting with multi strands but when you change your mind, what a pain to un-strand (is that a word?).
An hour or so later, I had what I wanted


My idea was to make a giant granny square.
First round I combined the pale pink glittery hairy yarn and the plain pink yarn in the back with the hook on top.


I actually did this round with the 8mm, but it was a little stiff, so I went on with the 15 mm after that.
Next round is the thick black and the glittery black hairy yarn.


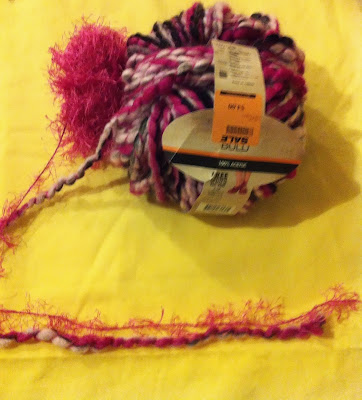
Third round is the multi coloured rug type yarn and the bright pink hairy yarn.


Fourth round is black again, and the last round is back to the first colour.


It came out better than I'd hoped. 

close up view

Now I just have to figure out what to make with it. My original intention was for a bag, I'm not so sure now.

Thoughts anyone?